
It’s that time of the year, and I know we’re all getting excited for family celebrations, Easter egg hunts, and those naughty treats we’d totally never eat otherwise.
All those pies and pastries and cookies and hot cross buns…yum! Right?
No!
As you may already know, all that processed junk, gluten, butter, dairy, eggs, and other unhealthy ingredients are hard on the environment, hard on the animals they come from, and hard on your body.
Binging on these foods, even if it’s only for a few days, just isn’t optimal for thriving, glowing good health. Lucky for us, we can actually enjoy all the Easter flavors we love and crave, but skip the processed, non-vegan, and otherwise unhealthy ingredients.
Don’t believe me? It is possible, and I’m going to prove it.
I hope you enjoy these three crazy-yummy, healthy Easter recipes—they’re some of my favourites.
(Note: I have included a few ingredients in these recipes, like coconut oil and powdered sugar, which I don’t normally recommend to my clients and readers. However, since this is a special occasion, and since these recipes are still so much better for you than the traditional alternatives full of egg and butter and all the rest, I’ve made a few exceptions.)
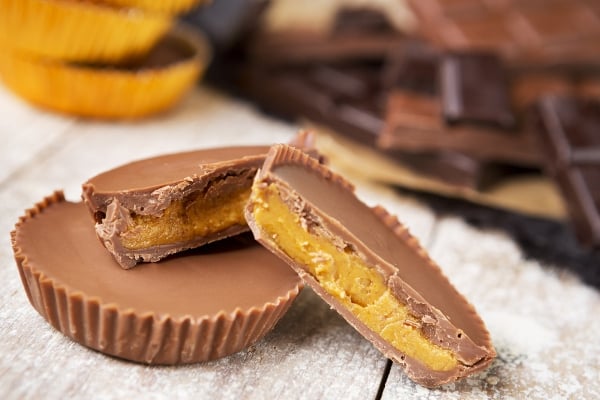
Sensational Plant-Based Peanut Butter Cups
A café in my home town of Byron Bay, Australia used to serve these amazing vegan peanut butter cups…so you can imagine my disappointment earlier this year when I discovered they’d changed the ingredients (god knows why) to include dairy, and without telling anyone!
Obviously I had to learn how to make my own. My vegan peanut butter cups are so darn good, I know you’ll love them as much as I do.
Simple Ingredients:
½ cup natural peanut butter (or any other nut butter—go wild!)
¼ cup dates, soaked at least 10 minutes
½ teaspoon vanilla extract
¼ teaspoon Celtic salt (optional)
1¼ cups vegan chocolate chips
Step-by-Step Directions:
1. In a medium-sized bowl, combine peanut butter, soaked dates, vanilla extract, and salt until it takes on a soft, dough-like consistency.
2. Melt chocolate chips in a double boiler. (If you don’t have one of those, no problem! Just pop a heat-safe bowl over a pot, and voilà! The bowl should rest comfortably in the pot with some space for water underneath. Fill the pot with a few centimeters of water, put the bowl on top and add your chocolate chips.) Bring the water to a boil and gently stir the chocolate chips until completely melted, then remove from heat.
3. Now, lay out some cupcake liners on a baking sheet, and add just enough melted chocolate to cover the bottom.
4. Make small disks (just a tiny bit smaller than the cupcake liners) with your peanut butter mixture, and place them into each chocolate cup.
5. Seal the deal by pouring more melted chocolate on top, letting the chocolate go around the sides of the dough, too.
6. Place in the fridge to set for about 30 minutes. Once the chocolate hardens, you can pop them out of the liners, or leave them in for mess-free snacking. Store in an airtight container…if they don’t disappear immediately.
Super-Satisfying Cinnamon Cookies
What happens when we remove all the refined sugars, processed flours, butter, and other animal products from a cookie recipe?
Magic. Magic happens.
The whole family is sure to go crazy for these sensationally tasty, cruelty-free cinnamon cookies. No extra kilos in sight, here…
Simple Ingredients:
1/5 cup coconut oil (special exception for Easter, gorgeous!)
¼ cup maple syrup (my personal favourite, but feel free to substitute agave or another natural sweetener)
1 teaspoon pure vanilla extract
1 teaspoon cinnamon
dash of Celtic salt (optional)
12 tablespoons brown rice flour
8 tablespoons tapioca starch
8 tablespoons sweet rice flour
Step-by-Step Directions:
1. Preheat oven to 175°C (350°F). Line a baking tray with parchment paper, prepare your rolling area, dig out your favourite Easter cookie cutter(s), and get your little angels in the kitchen. Now you’re ready to get the party started!
2. Put your coconut oil in a large mixing bowl and whip it with an electric mixer to soften. Add maple syrup, vanilla extract, cinnamon, and salt, and combine. Add remaining ingredients (except for the raisins), and mix with a wooden spoon.
3. Now use your hands—get your little ones to help!—to keep mixing, working the dough until you can shape it into a ball. Dough should hold its shape without being sticky. Take your time to knead it thoroughly, and if it’s still a bit sticky, add another tablespoon of flour. If it’s too dry, add another tablespoon of sweetener.
4. Take all of that dough and form it into a big ball, then flatten into a disk-like shape. Place it between two sheets of parchment paper, and roll it out with a pin or heavy bottle until it’s around ½ a centimeter (¼ inch) thick. Hand the cookie cutters over to the little ones, and let them go wild! Transfer your beautiful cookies-to-be to the baking sheet you prepared, leaving about a centimeter (½ an inch) between them. Gather your dough scraps, and repeat!
5. Bake for 10-13 minutes, until edges are just turning golden. Time will vary, depending on cookie size, but don’t over-bake—cookies will harden quickly as they cool. Remove from oven and transfer to cooling rack.
6. Allow to cool enough that you don’t burn your tongue, and enjoy with family and friends.
Oh-So-Dreamy Sweet Potato Pie
My whole family just loves this perfectly sweet, creamy pie. The coconut almond crust is unbelievably good, too. And the best part? Every single ingredient in here is as good for your metabolism as it is for your taste buds, so you can dig in with ease!
(Note: If you see purple sweet potatoes at your local market, use them—they turn this recipe a stunning shade of purple.)
Simple Ingredients:
Crust
¼ cup coconut oil, melted
¼ cup pure maple syrup
1 cup almond meal
1 cup unsweetened shredded coconut
¼ teaspoon Celtic salt (optional)
½ teaspoon baking soda
Dreamy Filling
1 kilo (2 pounds) sweet potatoes, peeled and sliced thick
¾ cup coconut milk (check the label and choose a preservative-free one!)
½ cup maple syrup (or less if you like things a bit less sweet!)
1½ tablespoons tapioca starch
1 tablespoon fresh lime juice
2 teaspoons ground cinnamon
½ teaspoon Celtic salt (optional)
1 teaspoon ground ginger
½ teaspoon allspice
¼ teaspoon cayenne pepper (optional—or use more if you like a kick!)
¼ teaspoon ground cloves
Guilt-Free Coconut Whipped Cream
1 can full-fat, additive-free coconut milk
2 dates (soaked for at least 10 minutes, and up to 12 hours)
Step-by-Step Directions:
1. Preheat oven to 175°C (350°F). Grease a 20-centimeter (9-inch) pie pan with coconut oil.
2. Combine all those crust ingredients in a large bowl, then transfer them to your pie pan. Wet your hands to make them non-stick, and press the crust evenly into the bottoms and sides. Why not get your little ones to help, too!
3. Bake for 10 minutes, until the crust puffs out a bit and turns a gorgeous golden-brown. Use the back of a spoon to gently push the crust down, and resist the urge to eat the crust and skip the rest of the recipe!
4. Now for our dreamy filling: Bring a pot of water to a boil—make sure there’s plenty of space for all your sweet potatoes—then add those beauties and cook for 10 minutes at a boil, or until soft enough to poke a fork into them. Drain, then add sweet potatoes to a high-speed blender or food processor.
5. Next, add all your filling ingredients, and blend on high until smooth as a dream.
6. Pour filling into the crust, even out the top, and bake 45 minutes, or until “firm-with-a-bit-of-wiggle.” Let cool before serving. Remove the pie from the oven and let it cool completely before serving it.
7. Finally, a vegan whipped cream you can enjoy in abundance! First get your coconut really cold by leaving in the fridge overnight (or at least an hour if you’re in a hurry). We want the cream to separate from the milk. Then separate the hard cream on top, transfer to a large bowl, and add the dates. Use an electric beater to beat the cream for 2-3 minutes. Don’t expect it to stiffen like traditional whipped cream—just get it firm enough to spoon on top of each slice.
8. Serve, share with loved ones, and enjoy these amazingly satisfying flavours!
Happy Easter, everyone! Please share your vegan recipe success stories with me in the comments!
~
Author: Donna Wild
Images: Annabelle Orozco/Flickr
Editor: Catherine Monkman


Read 0 comments and reply